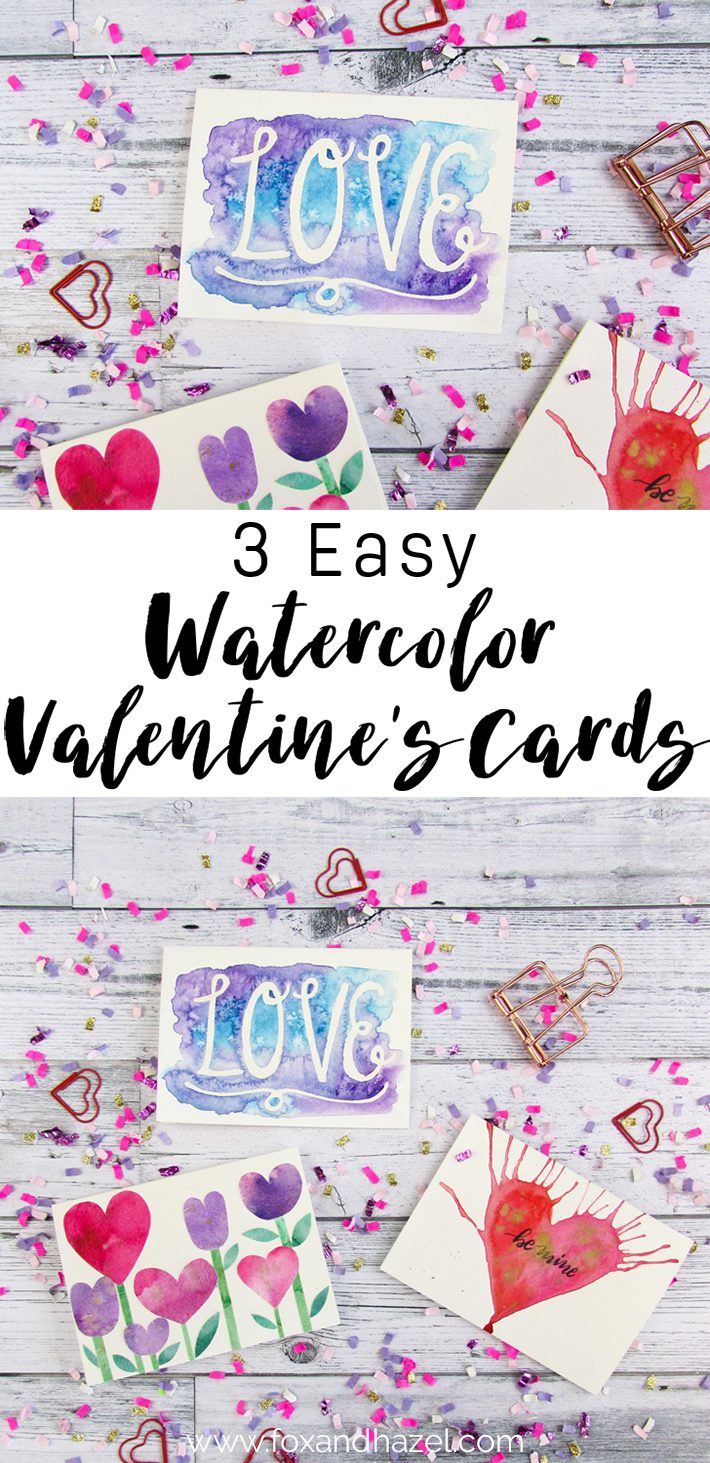
3 Easy Watercolor Valentine Cards
Some links in this post are affiliate links to products I love!

In my opinion, every holiday is a great excuse to make something handmade for literally anyone. Your mom, your spouse, your kid’s teacher, the mailman – anyone! Giving something handmade makes the recepient feel extra special because it means you spent your valuable time on making something just for them. These watercolor Valentines are a really easy way to do this! And they aren’t very complicated or require a ton of stamps and adhesives and papers. Although those style of cards are also super cute!
I’ve got 3 really easy watercolor Valentines cards you can make in a flash with minimal supplies. They are also a great excuse to use that new watercolour set you got for Christmas! Anyone else get one? I totally did and I think my watercolour collection might be getting out of hand (said no one ever!)
Read below to find out how to make each of these super fun and thoughtful watercolor Valentines cards!
1. Off Beat Love Watercolor Valentines Cards

I’m using:
- Blank note card set
- Kuretake Gansai Tambi Watercolor set
- Round 2 and 1 watercolor paint brushes
- Masking fluid
- table salt
Steps:
- Write out the word you want to use on your card very lightly in pencil. I chose LOVE in quirky lettering.
- Using a paintbrush, paint the masking fluid over your lettering. You don’t want a lot, but enough to create a good seal on the paper.
- Using a larger paintbrush, wash over the entire card with water. Then add watercolors to the wet paper. Try to use at least 3 complimentary colors, and don’t use too much!
- While the paper is still wet, sprinkle salt sparingly over a few places. This creates that cool speckled effect!
- Let it dry completely, and brush off the excess salt. Then carefully peel/rub off the masking fluid. Ta da!

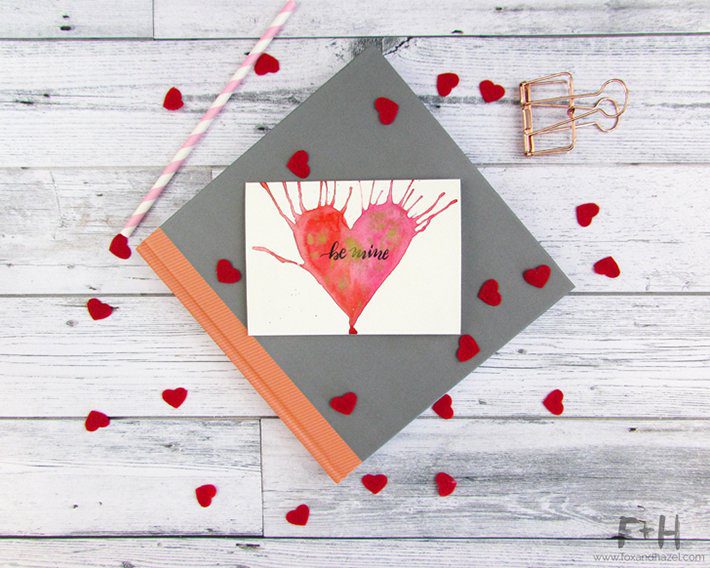
2. Heart Splatter Watercolor Valentines Cards

I’m using:
- blank note card
- Kuretake Gansai Tambi watercolour set
- Round 2 paintbrush
- straw
- Pentel Sign Pen in Black
Steps:
- Using a pencil, draw the outline of a heart. Easy, right?
- Cover the entire heart area with water, then add your paint to it. Use a variety of reds & pinks, and a little bit of gold if desired.
- While the paint is still wet, use the straw to blow the paint up the card. Add more paint to the heart if needed.
- Splatter with gold paint!
- Let dry completely.
- Once the card is dry, letter a sentiment on the front using the brush pen!
3. Cut & Paste Garden Watercolor Valentines Cards

I’m using:
- blank note card set
- Kuretake Gansai Tambi Watercolor set
- paint brush
- scissors
- glue stick
- 90 lb watercolor paper, or any cheap paint paper (I’m using one of my kid’s pads!)
Steps:
1. Using the watercolor paper, paint a couple of rectangles in the colors you’ll want for the flowers. I did a rectangle in reds/pinks, purples for the petals, and two different greens for the stems/leaves.

2. Let the paint dry completely. Next, cut out the flower shapes. I did hearts and a sort of tulip-ish shape, as well as stems and leaves.

3. Glue down the pieces to create a wonderful Valentine’s Day garden!

Now you have a handful of lovely handmade Valentine’s to shower your loved ones with! These cards are so simple to make that they would be a perfect craft to do with your kiddos for their classmates. How fun would the lettering ones be to customize for each of their friends? So cute! I hope you have fun making some thoughtful cards for the peeps in your life.
Love this post? Then make sure to Pin It below!