
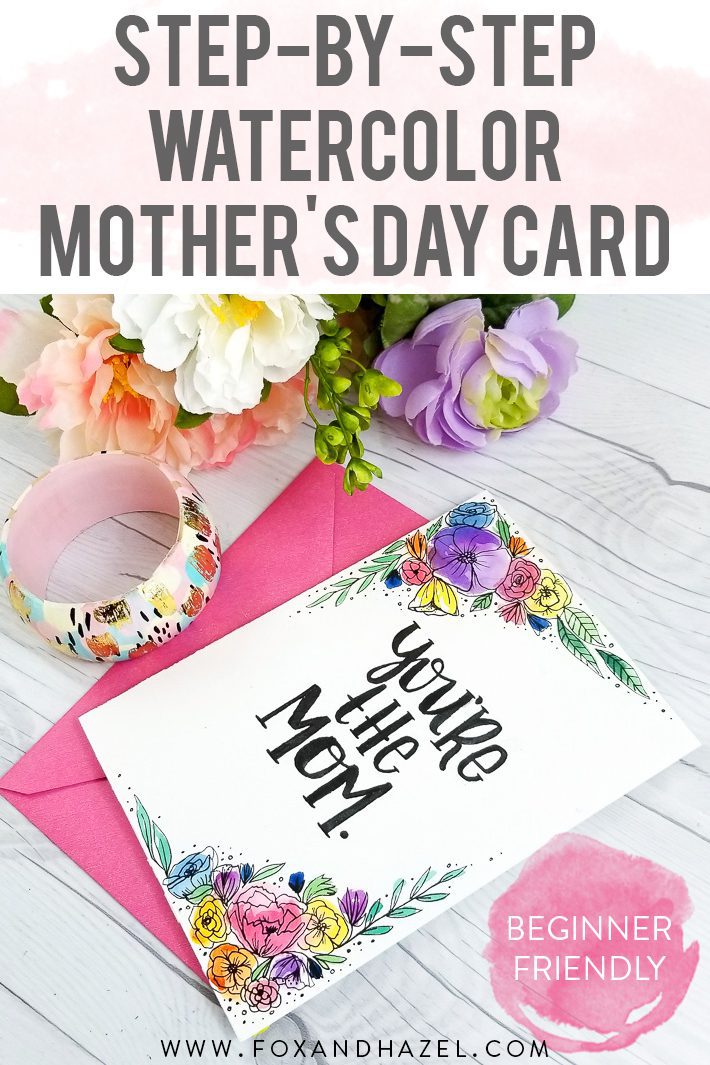
Easy Watercolor Mother’s Day Card Tutorial (Step-by-Step)
Some links in this post are affiliate links to products I love!
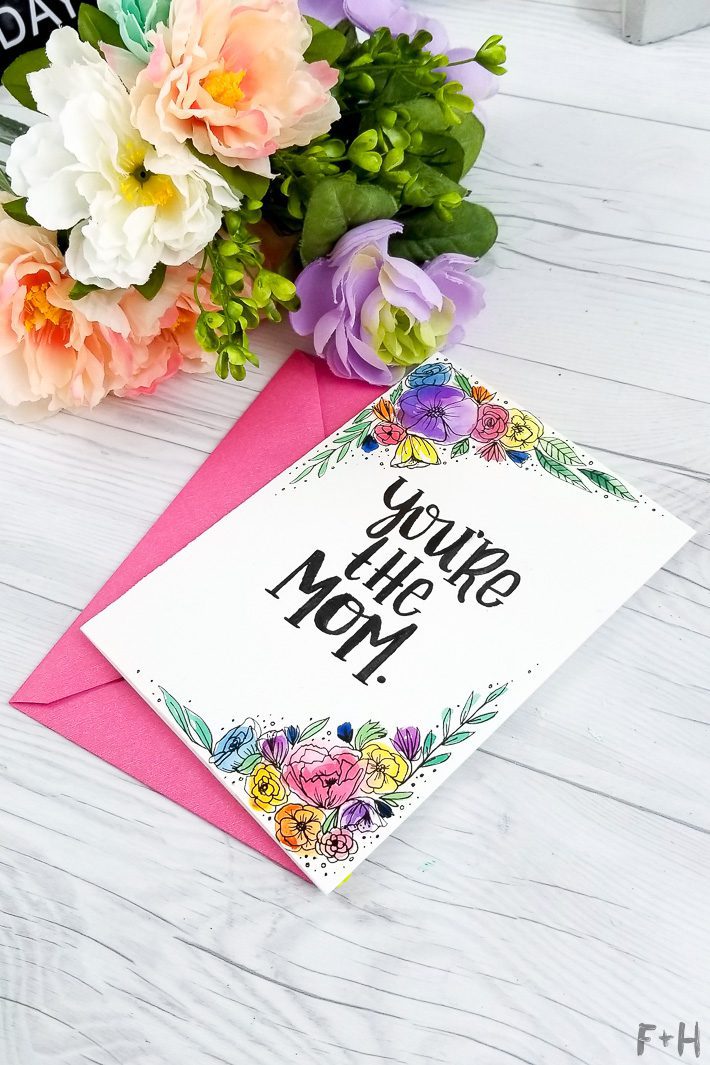
Mother’s Day is coming up and I know you’re probably wondering if you should make your mom a card. The answer is yes and this watercolor Mother’s Day card tutorial is going to show you exactly how to do it! I’m going to walk you through this step-by-step watercolor process from start to finish. You can totally do this even if you’ve never picked up a paintbrush before! Plus, how many brownie points are you going to get for making your mom a handmade card? So many. What mom doesn’t love a handmade gift from their kids, whether they’re 5 or 25? My mom is in her 50’s and still loves my handmade gifts, haha. Trust me when I say this Mother’s Day card is going to be a total winner!
Supplies For Step-by-Step Watercolor Mother’s Day Card
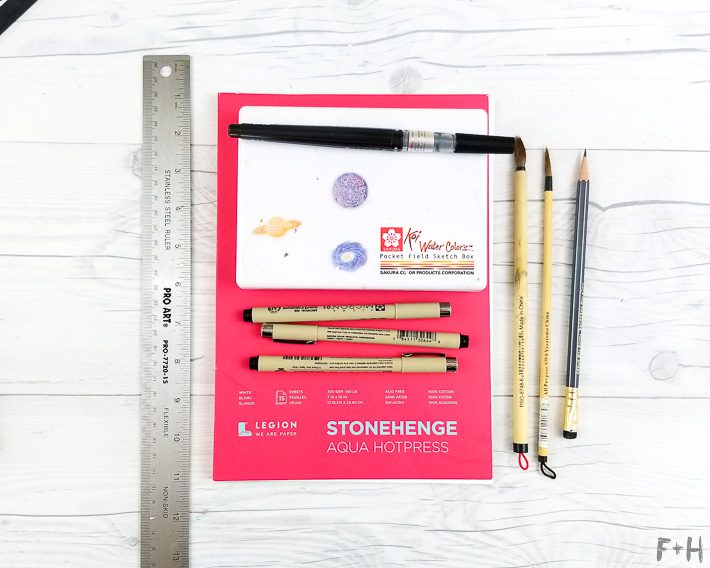
- Stonehenge Hot Press 140 Watercolor Paper
- Watercolor palette of choice (I’m using a Sakura Koi Field kit!)
- Chinese calligraphy brushes. Here are ones similar to mine.
- Sakura Pigma Micron Pens in 01,03, 05
- Pencil
- Ruler
- Pentel Color Brush Pen in Black
Step 1: Fold Your Watercolour Paper into a Card
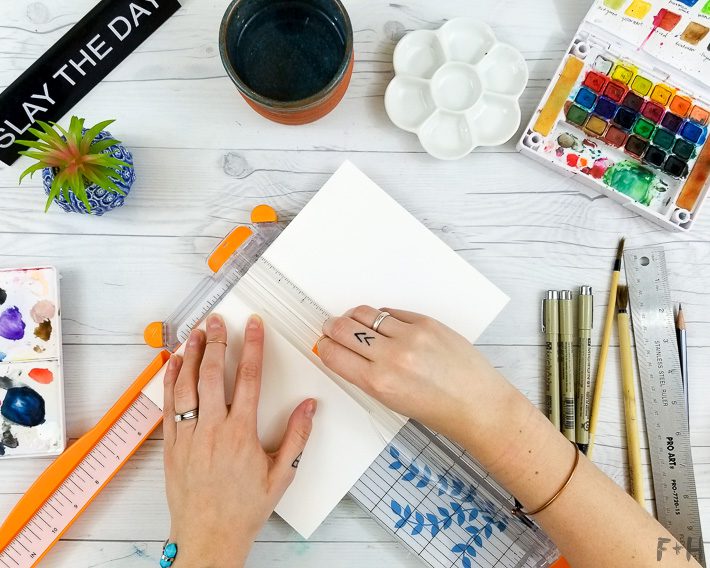
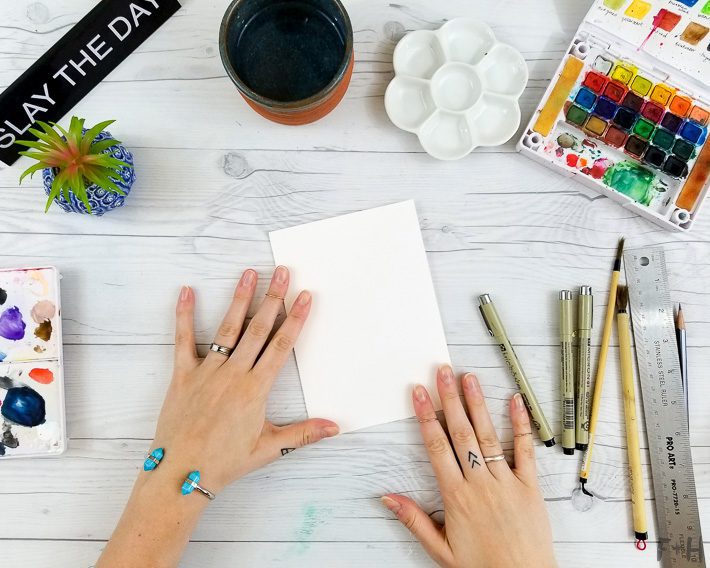
First things first for this DIY watercolor Mother’s Day card. You’ll need to grab a sheet of watercolour paper and turn it into a card. My paper is 7″x10″, so I just scored a line down the center and folded it in half. Bam, instant card! If you use a paper cutter, cut lightly so you’re just scoring the paper to make it easier to fold.
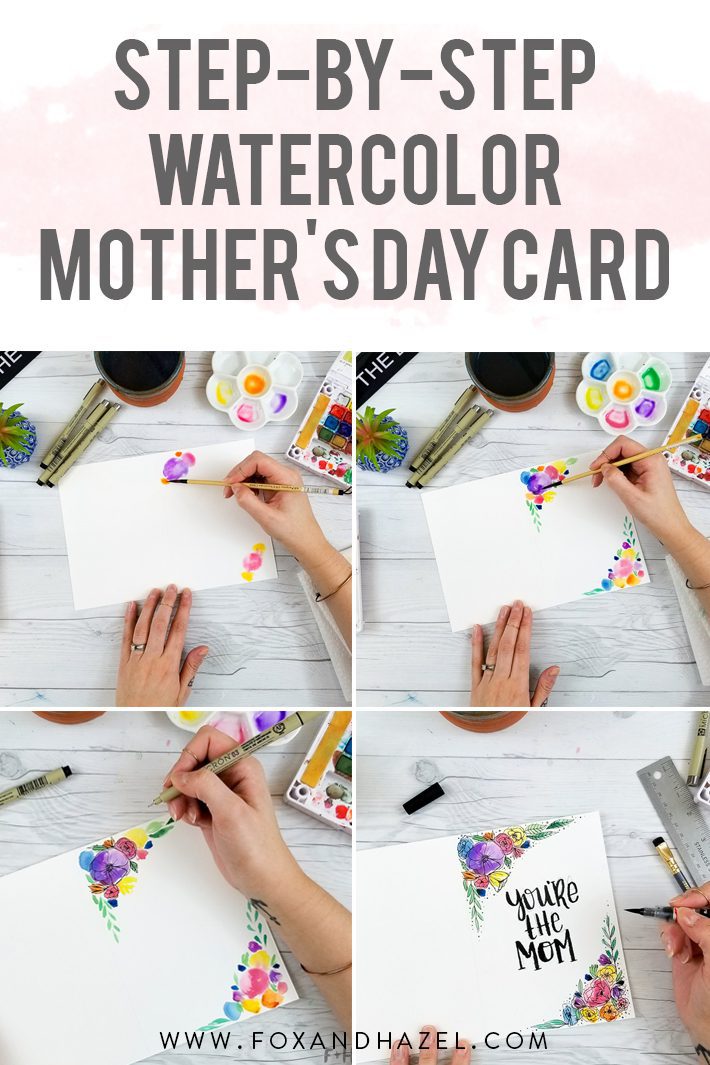
Step 2: Paint Your Watercolour Flower Blobs
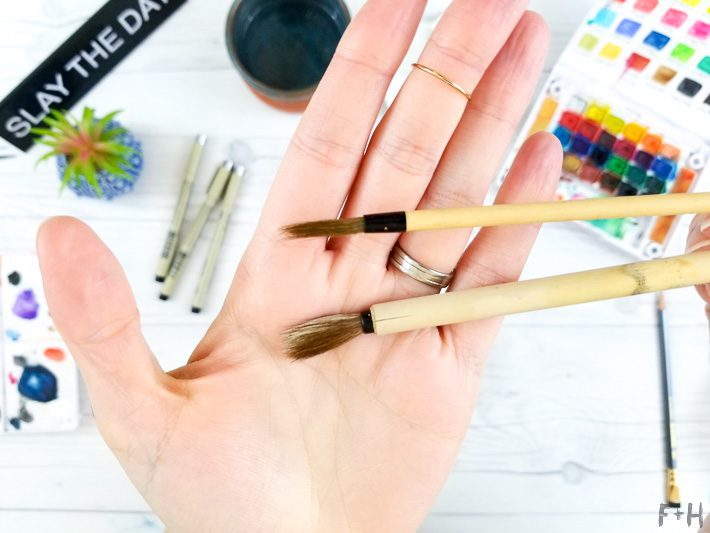


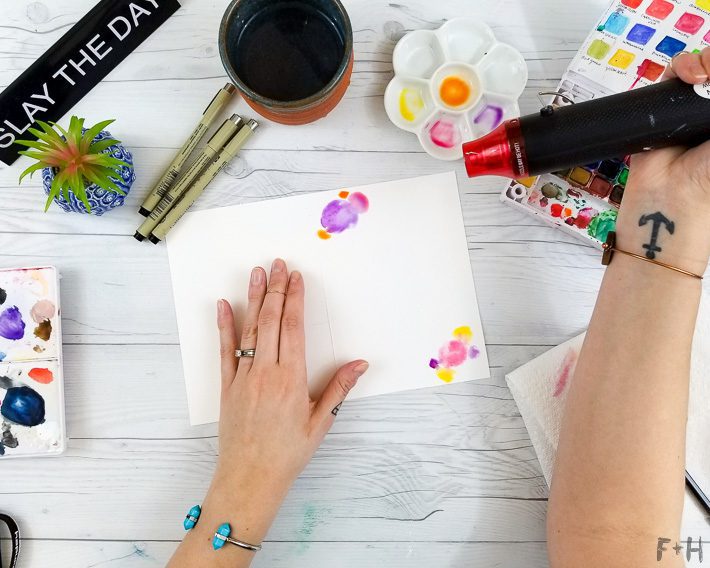
Before we dive into this step-by-step watercolor tutorial, quick disclaimer: you do not need Chinese calligraphy brushes for this. I just happen to be using them, but whatever watercolour brushes you have on hand will totally work!
Now grab your brush and load it up with a colour you love. We’re going to create two large circular blobs in opposite corners on the front of your card. Keep adding smaller blobs in complementary colours around the larger ones. You can let the colours touch and bleed into each other a little, that’s part of the charm!
Just don’t go too heavy on the water or everything will run together. Let the first round of blobs dry completely before adding more to fill in the white space and build up that bouquet feel.
STEP 3: Add Leaves and Stems
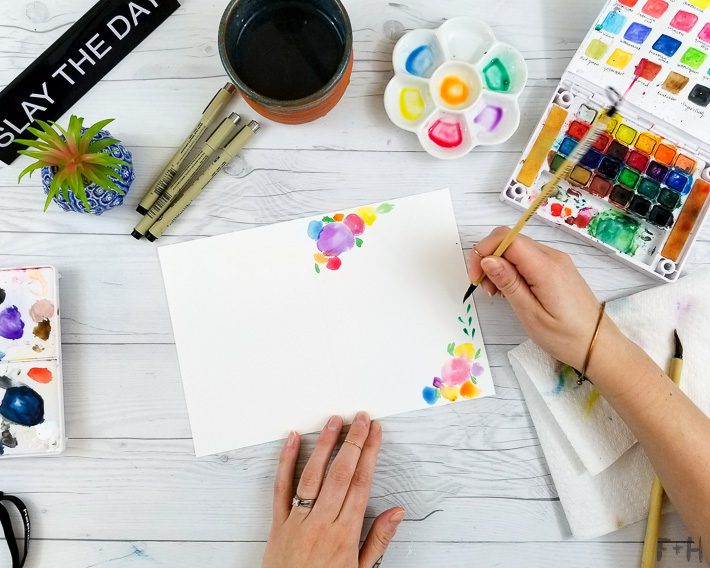
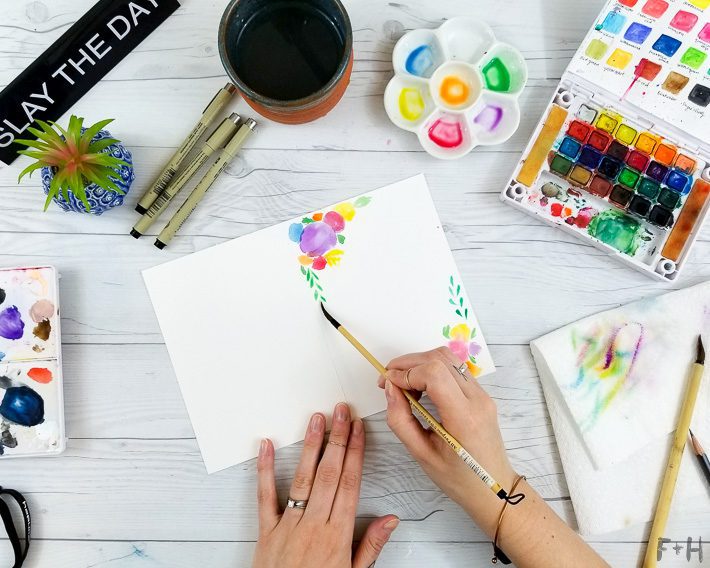
Using just the tip of your brush, add some loose leaf shapes around and between the watercolour blobs. Work outward from the bouquets and add some stems and vines to frame everything in. Once the stems are in place, let everything dry before moving on.
I know there are a lot of photos in this step-by-step watercolor tutorial and I did that on purpose! I wanted to make sure nobody was left wondering what the heck happened between one step and the next.
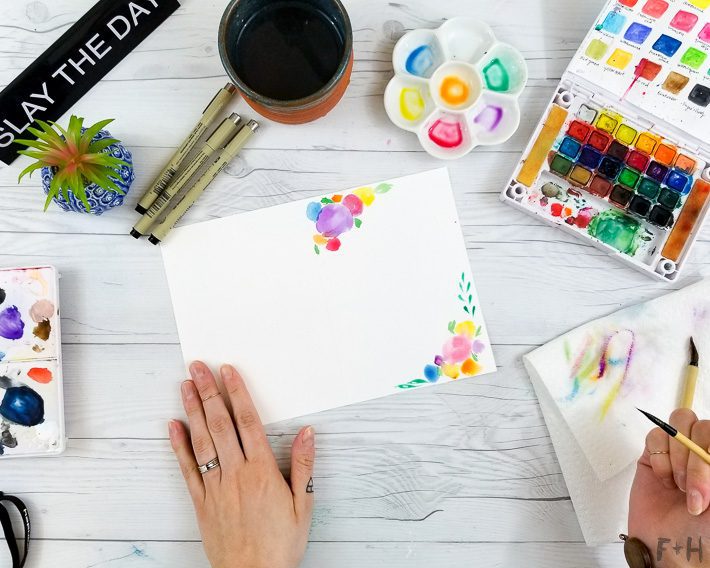
Step 4: Go Back and Tweak
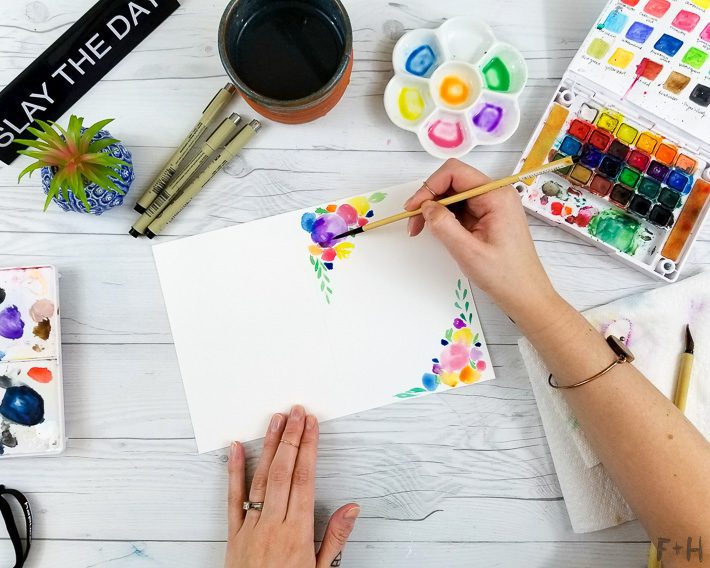
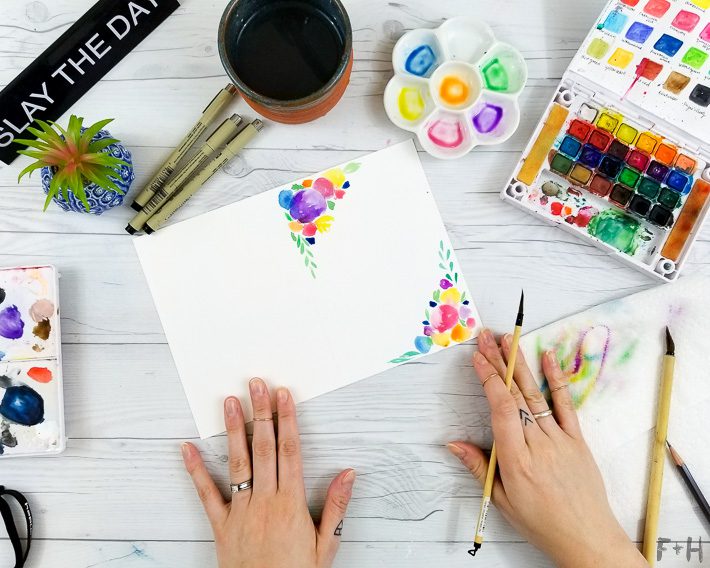
This is your chance to fill in any empty spots or add another layer of paint to your flower blobs. Here’s my favourite thing about this watercolor Mother’s Day card tutorial: you make the rules! I almost always go back and keep adding little bits and pieces even when I think I’m ready for the next step. Give yourself permission to do the same — nobody gets it perfect on the first pass and that’s totally okay!
Once you’re happy with how it looks, let the paint dry completely before you move on to drawing.
Step Five: Draw Over the Blobs with Ink
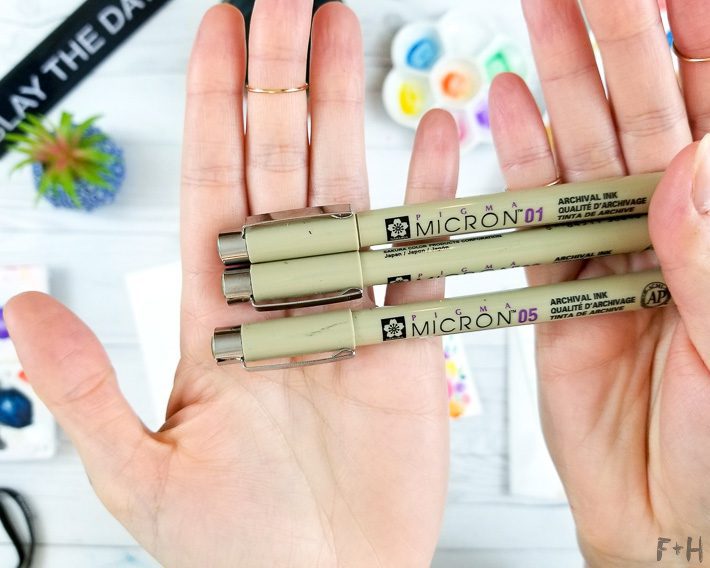
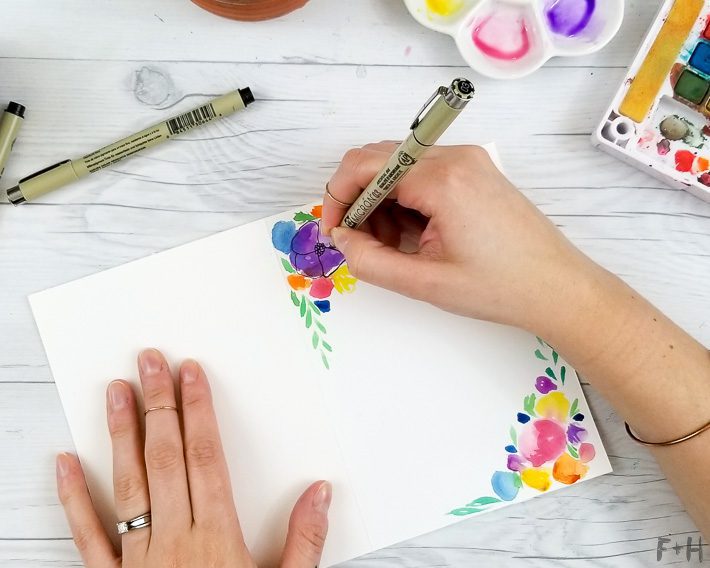
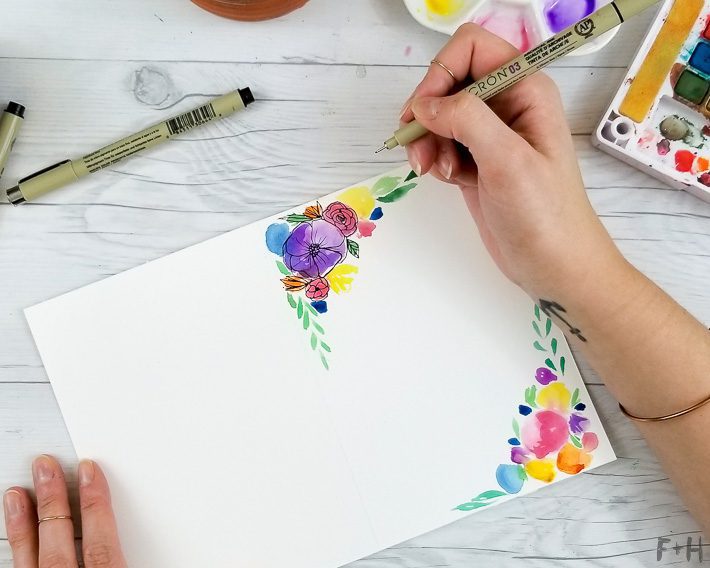

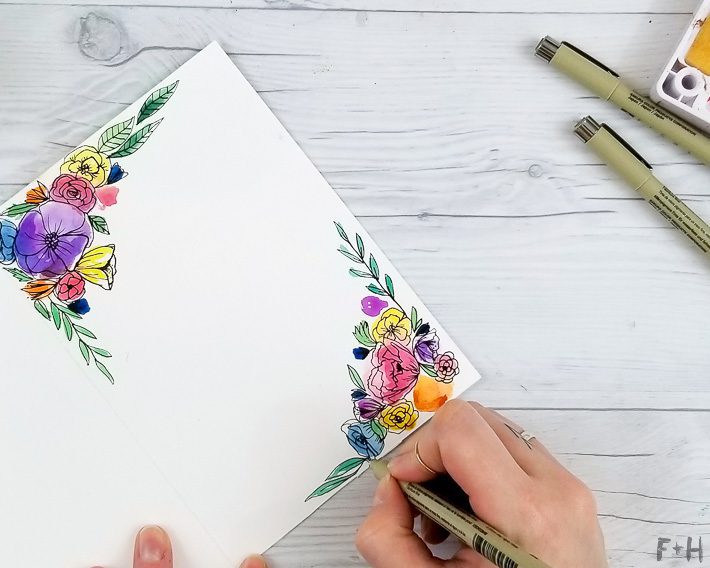
Now the really fun part of this DIY watercolor Mother’s Day card — we draw! Using your Micron pens (or any black ink pen you have), draw over each blob to turn it into a flower or leaf. The key here is to NOT try to fit your drawing perfectly inside the paint blob. See those little white spaces where the lines hang over the edges? That’s intentional! It gives the whole illustration a loose, whimsical feel that makes this Mother’s Day card look so good. Keep going until you’ve got two gorgeous little bouquets!
Also, if you’re looking for books to learn how to draw flowers better, then check out my post on 12 books to learn how to draw flowers easily. I personally own, love and highly recommend both Modern Florals by Alli Koch and Botanical Line Drawing by Peggy Dean. They are great for beginners and novices alike.
Step Six: Add Your Lettering


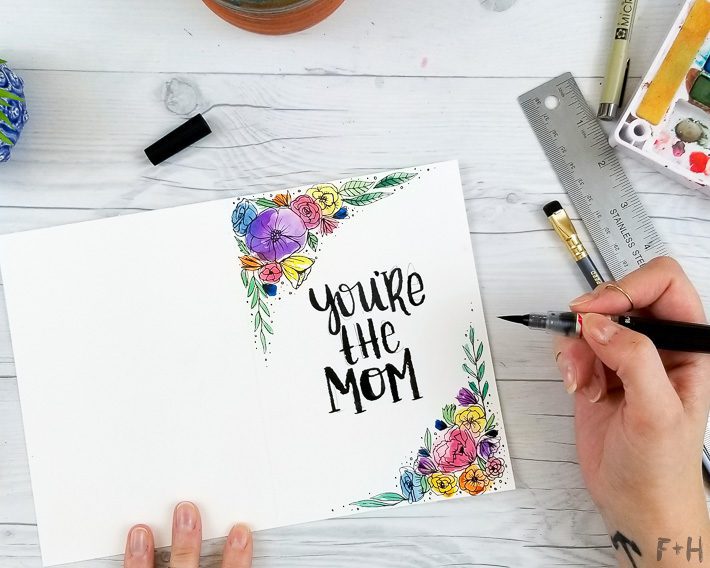
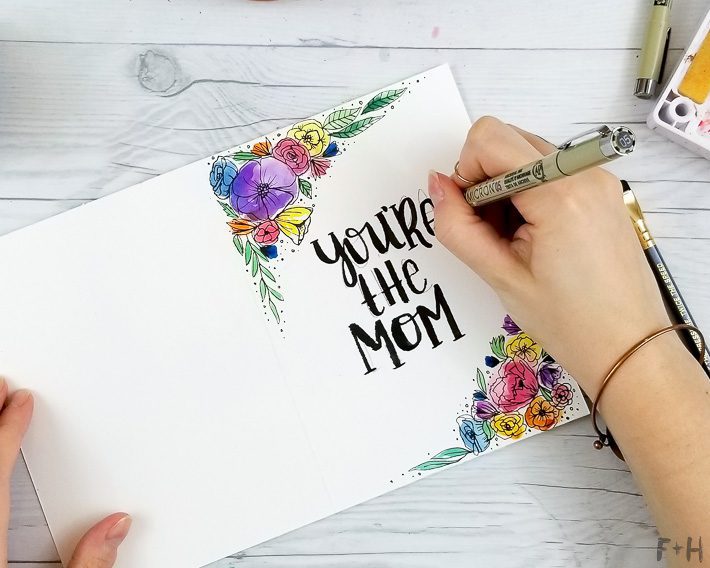
Last step of this step-by-step watercolor Mother’s Day card tutorial – the lettering! Using my favourite pencil, lightly sketch out your sentiment first. I’m a sucker for a good pun (I’m a millennial, not even sorry), so I went with a play on “You’re The Bomb.” But honestly, write whatever feels right for your mom! Once you’re happy with the sketch, go over it with your Pentel Brush Pen to get those satisfying thick downstrokes. Clean up any edges with your Micron pens and you are DONE.
I am by no means a hand lettering hero, so write however you feel works best for you too. This is my go-to weird rando typeface I made up. After you write out the letters, if you need to clean up the edges or do any touchups, use the Micron pens to do so. You can use the Color Brush, but since it’s a nylon brush tip it’s a bit harder to manage for detail cleanup.
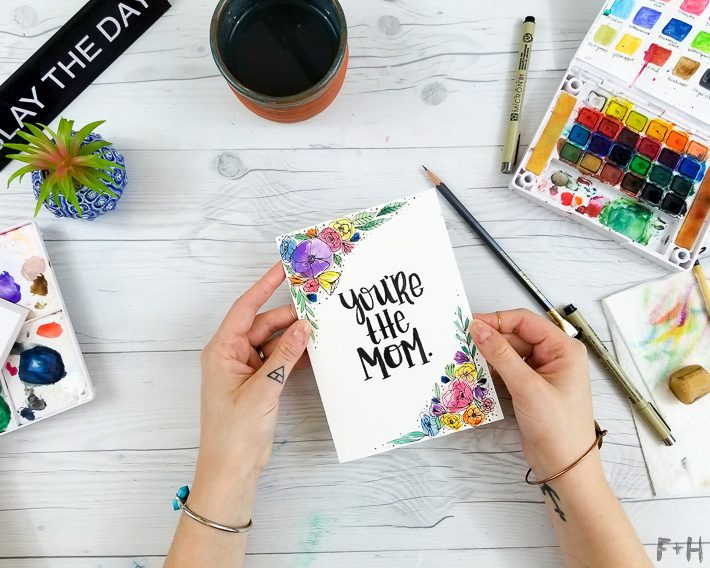
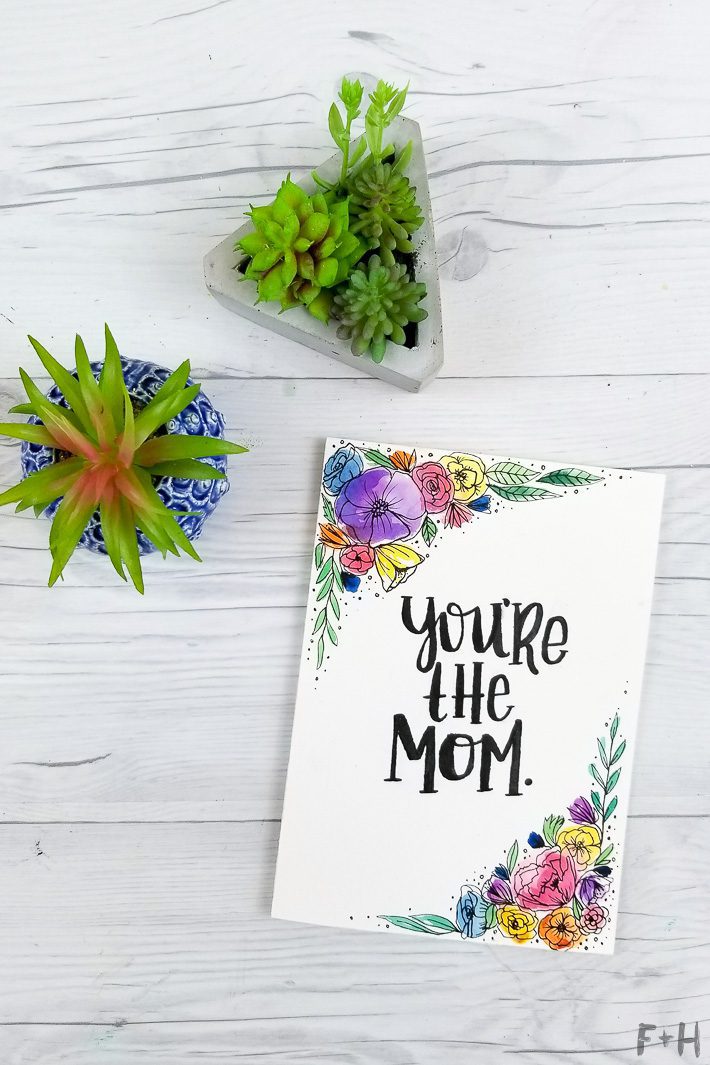
You’re done! You’ve got yourself one super cute and handmade Mother’s Day card. Your mama is gonna looooove it! And see how easy watercolor can be? I hope this step-by-step watercolor tutorial gave you the confidence to just go for it. I plan to share more beginner-friendly tutorials, so let me know in the comments what you’d like to see next!
If you loved painting this card and want to keep the watercolour momentum going, you should totally try the 30 Day Watercolour Challenge! It’s a free daily painting prompt challenge with four complete sets of prompts designed for beginners. The perfect next step after your first watercolour project!
If you loved this project, you can spread the love in one of these ways!
Let me know in the comments what other step-by-step watercolor tutorials you’d like to see.


11 Comments
Cool Mother's Day Gift Ideas on Etsy – Fox + Hazel | free art + designs
April 12, 2026 at 5:12 pm
[…] for a really nice handmade card to go with one of these gifts? Try your hand at painting with this Easy Watercolour Mother’s Day Card Tutorial with step-by-step […]
Easy Masking Fluid Watercolor Art Tutorial | Page Flutter
February 17, 2022 at 11:52 am
[…] Tell me – what other watercolor tutorials would you like to see on Page Flutter? Comment below to ask all those burning art questions! If you just can’t wait, you can find even more beginner watercolor tutorials over on Fox + Hazel. Like this Watercolor Mother’s Day Card Tutorial! […]
Mom Painting Ideas · Craftwhack
February 14, 2022 at 11:47 pm
[…] Get the guide for Watercolor Mother’s Day Card on foxandhazel.com. […]
Easy Watercolor Cityscape Step-by-Step Tutorial | Dawn Nicole Designs®
April 24, 2018 at 1:54 am
[…] Easy Watercolor Mother’s Day Card // 3 Free Palm Tree Leaf Prints // Memphis Design Pencil Case […]
kellyjo
April 18, 2018 at 1:16 pm
I LOVE this!! (´∀`)b Thank you so much!
Deborah
April 17, 2018 at 8:30 pm
I appreciate the Mother’s Day card tutorial so much. I am an absolute beginner, watercolor enthusiast. I have no idea where to start at all. I have been watching videos and reading blogs and information. I have gathered supplies. I’m ready, but I don’t know where, or how, to start. I could start with this card, because you have showed me, step-by-step, had to do it! I’m excited. I would love to see more beginner videos. Thank you so much!
torrielynn
April 17, 2018 at 8:58 pm
I’m so glad you found all the photos useful Deborah! This card would be a great starter project. It’s small enough that it’s not too intimidating and it doesn’t require a lot of detail work. I’d love to see your finished card when you complete it! 🙂
Erin
April 16, 2018 at 9:02 am
I have been wanting to get better at watercolor and this tutorial just gave me the motivation I need. SOOOO pretty!
torrielynn
April 17, 2018 at 9:57 am
You can do it Erin!! 😉
Kathy Jones
April 11, 2018 at 11:15 pm
Thank you so much for this easy tutorial!
torrielynn
April 17, 2018 at 8:32 pm
You’re so welcome Kathy – yours turned out beautifully!!